What is Miro?
Miro is an online whiteboard platform, like other tools such as Padlet, that is ideal for collaborative working and presenting information in a creative way. Miro is a tool that can be used effectively in several ways such as:
- remote brainstorming.
- mind mapping.
- designing
- planning
- demonstrating concepts.
- Presenting in a creative way.
Miro can be used within a synchronous session to engage with students as they can access and interact with the Miro board or used by students to collate and present project work in an inventive way.
How to access Miro
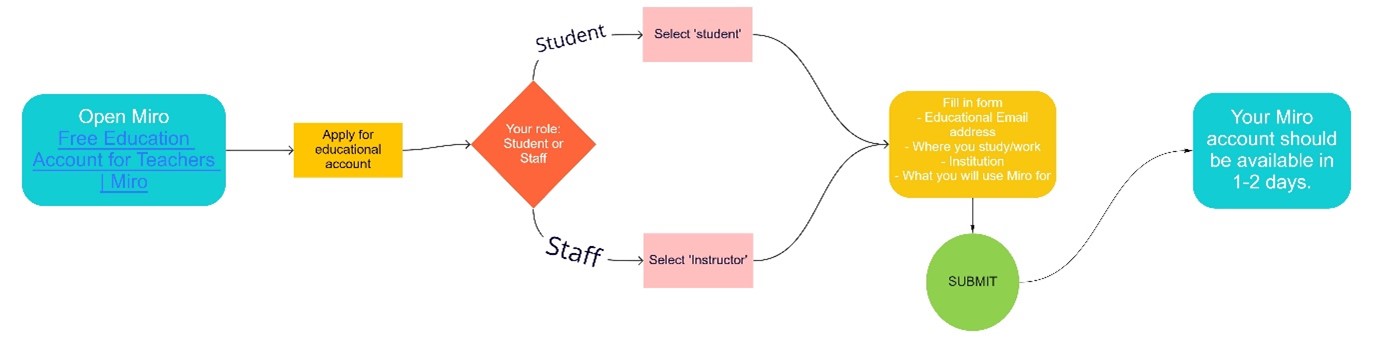
Staff and students can access Miro through their web browsers. To start creating with Miro you will need to create an account, we recommend applying for a free educational account to get the best functionality out of Miro. Both Staff and Student’s are eligible for an educational account and can be acquired by filling in this short Education account application form.
Basic functions in Miro
Miro’s basic functionality is like a lot of other interactive whiteboard tools such as Padlet, although it does offer additional tools. The following functionality is what you will need to understand to get start on Miro:
Boards – Boards are what all your content will be created on within Miro – if you are using the free educational account you will have access to unlimited boards and be able to invite unlimited collaborators. Boards in Miro are also infinite so you can continue scrolling within a board and continue to create new content.
Frames – Frames are a tool you can use to separate different items/ ideas within your boards, this means you can have many different things all within one board. Frames are also a great way of navigating within Miro as you can switch between frames and focus on the content within them.
Shapes – The shape tool can be used to draw various shapes onto your Miro board, these can be used as design features or as a space to hold text.
Text – The text tool in Miro works the same as a text box in other software’s. Once selected you can use this tool to create a space that you can fill with text. You can this tool to populate shapes and frames with text.
Sharing Miro boards
There are multiple ways to share your boards on Miro such as:
- Sharing with teams/projects – In Miro you can add other users to your team – once you have done this you can set you Miro board’s permissions so that other members in your team can view and edit your boards.
- Sharing via shareable links – Alternatively, to avoid enrolling other users to your teams in Miro you can set the permissions so anyone with a link can view/edit your Miro board and then distribute this link.
- Embedding into Blackboard sites – Once your permission are set to anyone with link can view/edit it is also possible to embed your Miro boards directly into your Blackboard site.
- Exporting as Image/PDF – it is also possible to export the frames within your Miro board as an image or PDF.
Accessibility considerations
Currently Accessibility is not one of Miro’s priorities and they do not have their own Accessibility Statement – therefore it is likely that it does not meet WCAG 2.1 requirements. Users that rely on keyboard navigation and screen readers are most likely to have issues with Accessibility on Miro, so this is something to consider when using this tool.