What is Padlet?
Padlet is an online collaborative noticeboard. It can be used in a variety of ways; collating notes, sharing resources, brainstorming. However, it can also be used for students to post questions (anonymously) during a teaching session or online. These questions can then be answered by either the tutor or by other students.
It can also be used as a way of collating questions and answers in relation to module assessment tasks. By using Padlet in this way you can provide an up-to-date, live resource that all students can access. It is definitely quicker and easier to manage than updating a FAQ sheet or replying to emails and individual discussion threads.
Padlet boards can be exported as an image, spreadsheet, or PDF file to provide a snapshot of their content at a given time. This is useful if you are using the board to support an activity with discrete stages and want to be able to refer back to the content and structure of the board as it was at the end of each stage.
A brief video outlining Padlet from an educators perspective is available as an overview.
How to access Padlet
Due to data protection concerns, you will need to give explicit consent to have a Padlet account created for you. A Padlet Account Request form is available (please note: you will need to log in using your Hallam Google account username@my.shu.ac.uk) for you to give your consent and request an account (Hallam staff only).
Once you have a Padlet account it can be accessed through a web browser at shu.padlet.org.
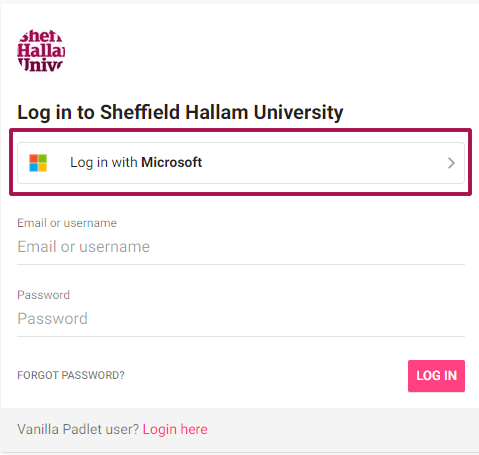
Click Log in with Microsoft and follow the log in process (you will need to use your Hallam Microsoft email address username@hallam.shu.ac.uk and Multi-Factor Authentication). If you are already logged into your Hallam Microsoft account then you will be taken directly into your Padlet account.
Basic use
Padlet is generally a fairly intuitive tool where double clicking on an empty part of the board creates a new note that can contain text, videos, images, links, etc. The main consideration when creating a new board is what type is the most appropriate for the activity, as there are eight options that work in slightly different ways to accommodate different purposes.
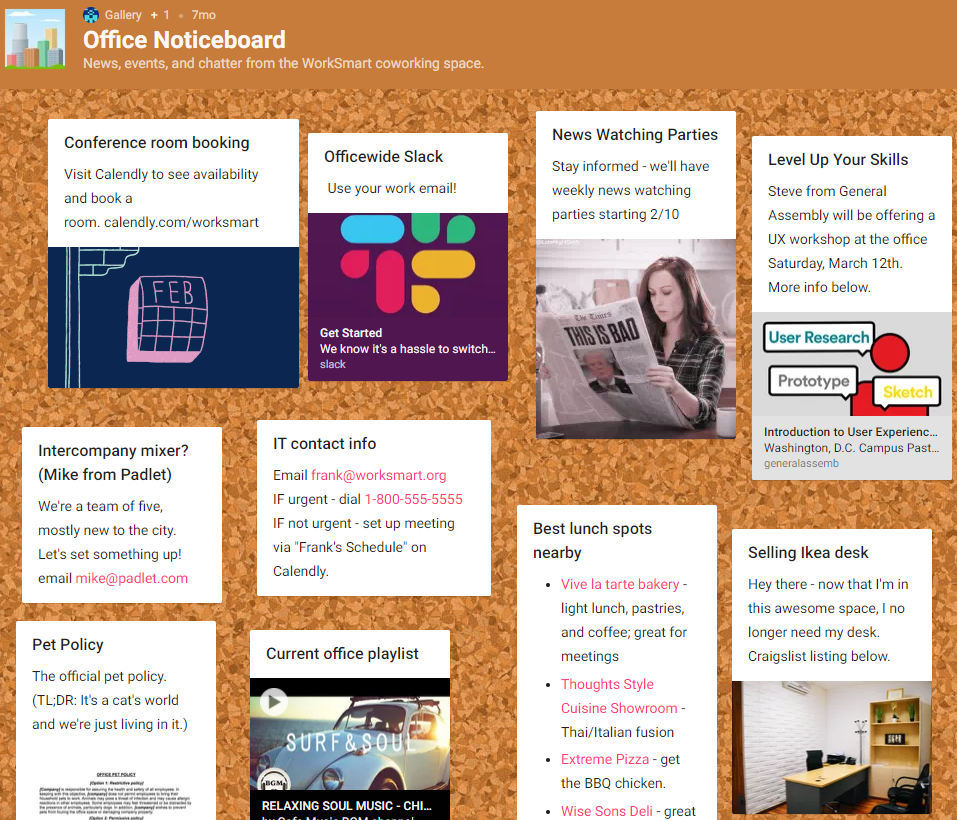
- Wall. Automatically arranges notes to reduce ‘whitespace’ and fit as many notes in as small a space as possible. Example Wall.
- Canvas. The most widely known layout, this allows notes to be moved around freely and positioned in any way, including overlapping each other. Most closely replicates a whiteboard and post-it notes. Example Canvas.
-
A Map-style board Stream. Useful for blog-type activities, this layout places large notes vertically, one after the next, resulting in a scrollable page of items. Example Stream.
- Grid. Similar to the Wall option, but organises notes into an equally sized grid rather than adjusting the layout to maximise the number of visible notes and minimise wasted space. Example Grid.
- Shelf. Notes are organised into categories under headers and can be moved between columns as needed – useful for categorising notes as well as tracking project progress Kanban/Trello-style. Example Shelf.
- Backchannel. A conversational layout that is suitable for a discussion or Q&A activity. Example Backchannel.
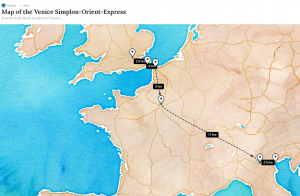
- Map. Lets notes be pinned to specific geographical locations. Example Map.
- Timeline. Useful for putting information in a sequence, such as a series of historical events or steps in a process. Example Timeline.

Once you’ve selected the type of board that you want, you’ll be presented with customisation options. Depending on the type, you’ll see options including changing the background, activating moderation, filtering swear words, and defining what your students can do with the board.
When your board is set up you can generally add new notes by double clicking (though some board types use an on-screen button for this instead), drag notes around to reorder or reposition them, draw arrows between notes to create a basic mind map, add grades, stars and likes to specific notes, and clear all notes on a board to start afresh.
The Padlet YouTube channel contains lots of short videos covering the different features of the tool.
Sharing Padlet boards with your students
There are a range of ways to share a Padlet board with students and the appropriate choice will depend on how and where it is being used. The main options are:
- Embed in a Blackboard module site – The live board will be shown directly in the module and can be interacted with without needing to open in a separate browser tab. Particularly useful for longer running activities or where students can contribute at a time that suits their needs. It can be good practice to share a link to the board in addition to embedding it to ensure everyone can access.
- QR code – The best choice for use in a live session where students have access to a mobile device to allow them to scan the code with the Padlet app and start to use the board. Save the QR code and add it to your slides or otherwise show it on screen for the students to scan at the appropriate time.
- Link – A general-purpose method that can be added to a slide, posted to a Blackboard module, emailed, etc. to give students more options for accessing the board, such as with a laptop in a live session.
The share options are available by clicking the Share button at the top right of the board followed by the option you want.
Tip: to present your board through Blackboard, make sure to use the ‘Embed’ option rather than the ‘Add to your LMS’ or ‘Google Classroom’ options.
By default all boards are Private, so only you will be able to access any that you set up. You should change this before sharing to ensure that others can access the board. This is also done through the ‘Share’ menu for the board and the available options are:
- Private. Only available to the owner and any individuals specifically shared with. This is useful if you want to use a board with a small number of other staff members, such as for a course development activity.
- Password. Available to anyone who has both the link and the password. This is not especially secure because both of those are easily shareable to other people, but it can be useful if you want to set up a board and embed it in Blackboard in advance and then provide the password at a specific time.
- Secret. Available to anyone with the link. This is generally the best option for making the board available to your students.
- Org wide. An alternative to sharing with specific staff, but be aware that it will appear alongside their own boards for every SHU staff member. As a result, Secret is the preferred option if you want to share with others.
This video demonstrates the entire process for making a Padlet board available to students through Blackboard (3 min).
Differences with Free version
The most significant difference between the free version of Padlet and this licenced version is that the free version is restricted to only 3 boards per account. The licenced version allows unlimited boards, though if you are creating lots of boards you should consider setting up Folders to make organising them easier.
The other main difference is that the size limit on file uploads is increased from 10 Mb to 250Mb. This can be useful for adding longer videos or higher quality images to boards, but bear in mind that upload and download times will increase accordingly and that larger files may cause problems if the students are using connections with data caps, such as 4G mobile data or metered broadband.
Padlet and Accessibility
Padlet does not currently meet the WCAG 2.1 AA accessibility standard, though they are working towards compliance. The main issues currently are:
- Keyboard access: The login page and dashboard can be navigated with a keyboard however, posts cannot be created or edited by keyboard only.
- Alternative descriptions for images, video and links: Alternative descriptions are not supported on images, videos and links. Descriptions should be added to the body of posts.
- Colour contrast: The colour contrast is not sufficient for low vision users. A browser extension, such as High Contrast for the Chrome browser, can be installed to increase contrast.
Given the issues above, you should carefully consider whether some students may be disadvantaged by learning activities that use Padlet. Where possible, mitigations should be made to allow all students to take part, perhaps by placing students into pairs or small groups where only one person needs to be able to add to the board, or by exporting spreadsheets of the board’s contents and sharing these with students in addition to a link to the board.